SHIPWRECK
This first unit: Beauty and Decay was very challenging because it is the first unit that we have done and at first I didn’t really understand the concept and what Beauty and Decay really meant. But we first start off with brainstorming of what Beauty and Decay is. My ideas at first were not simple but then as I kept thinking they became better. My top ideas that I thought I could do on Beauty and Decay was; Shipwreck, Decaying Memories, Flowers and run-down buildings. I narrowed it down and my top two were probably shipwreck and flowers.
Flowers can have the meaning of beauty (growing) and decay (dying), and I really liked the idea of creating something to do with flowers. But I also liked the idea of doing something with shipwreck; I can also relate to it more as my family (especially my granddad and my dad) really like boats. My final idea was then to do this, as I wanted to build boats.
I started sailing since a few years ago and I am now nearly finished my sailing course. My dad works on Al Said which is the big ship in Mutrah, and beforehand he has always worked on ships around other countries. My granddad also loves boat as when my dad and his sister were young they would always go sailing.
This Picture was one of the pictures that have inspired me as I really liked the idea of how the picture shows under the sea and above the sea. Which I thought really showed the meaning of Beauty and Decay.
My Process of my product was very challenging because my first step was to build a boat out of cardboard. But no scissors was needed because we want to give the effect of a ship that has sunk and has been underwater for a long period of time, and so if scissors were used it would make it look like a brand new boat that has just sunk. It wouldn’t give the effect of a sunken ship that I wanted.
On the left side this is the finished look of the first step, it took me quite long to finish this as I had to make it as simple as possible so I struggled with building it at first. But afterwards I was able to fix them.
My original idea was to then build the rest of the boat as my final piece but it sounded too hard and it may have taken too long. So I have been suggested to work on Photoshop, as it will be easier. But a problem I had was not knowing how to used Photoshop. I got help from Mr. Keys and he guided me all the way to my final piece.
I took a few pictures of my boat from different angle. We chose one and from then my work was mainly editing the image. I then picked a background and imported the picture onto the computer. I then had to crop the boat onto the background.
I struggled using Photoshop at first because I found it really hard and it is difficult to use it.
I then crop around the boat again after pasting it onto the background to make sure you can’t see anything else except for the boat.
I then blended it in with the background by pasting the sea colour on top of the boat and making reflections on the bottom of the boat. I did this by picking the darkest shade and made a reflection at the bottom of the boat. This process took really long.
The next step was to googled up images of coral reefs because at that moment my picture looked really plain so I thought by adding corals would help making it look more interesting. As also the corals can represent the Beauty and the ship can represent Decay.
I imported the coral onto the work as my background but I had to crop out the image because I only wanted some part of the coral. At first I liked how the coral really brought the boat out but then when I finished pasting in the coral I didn’t like how it look because the coral was too bright and it just didn’t seem to fit in anymore. So I just decided to paste the darkest shade of the sea onto it so you can only see a little bit of the coral if you really look into the work.
My final step was to add the mast in. I used sticks to make the mast and used sellotape to stick the mast together but it did not work as it kept falling apart. So I used glue gun and it work better. I then used a sewing kit as the strings on the boat. There are 3 strings at the front and then a few on the back but they are not connected to the back of the boat to give the effect of the strings being old so they broke.
Then I took a few more pictures of it with the same angle as the boat so when I have to paste the mast it would fit in with the boat on the Photoshop. Then trimmed the mast onto the boat and erased out all the white lines. On the left side shows the image of the mast being cropped and erased as there are still some white to the background and on the right shows it being fully cropped. After that I stamped the sea colour and pasted it onto the boat so it looks likes its’ blended into the sea and actually sunken.
This is my final product. What I really liked in this is that it turned out quite decent looking. I really liked the reflection of debris at the bottom of the sea that is just underneath the boat. It is almost camouflaged to the sea. I had to also adjust the boat as the original was the boat sitting upright but then I decided to tilt it so it looks like it is more in the ocean. I really also like the rays of lights shining into the boat because it really makes the boat stand out. The last thing that really stood out to me was the inside of the boat, the texture of it was really different to the boat it self.
This image has a meaning of Beauty and Decay to me; I had the idea of first doing something different but this I think captures more of what I really wanted. To me the beauty is the sea and the reflection of the light shining onto the boat. The upper surface of the water really brings out the boat that is sitting underneath the ocean surrounded by darkness. The decay has to be the boat. When I was doing my work I really made sure the texture of the boat was not the same so the cardboard that I used has been all ripped differently; with different sizes and shapes.
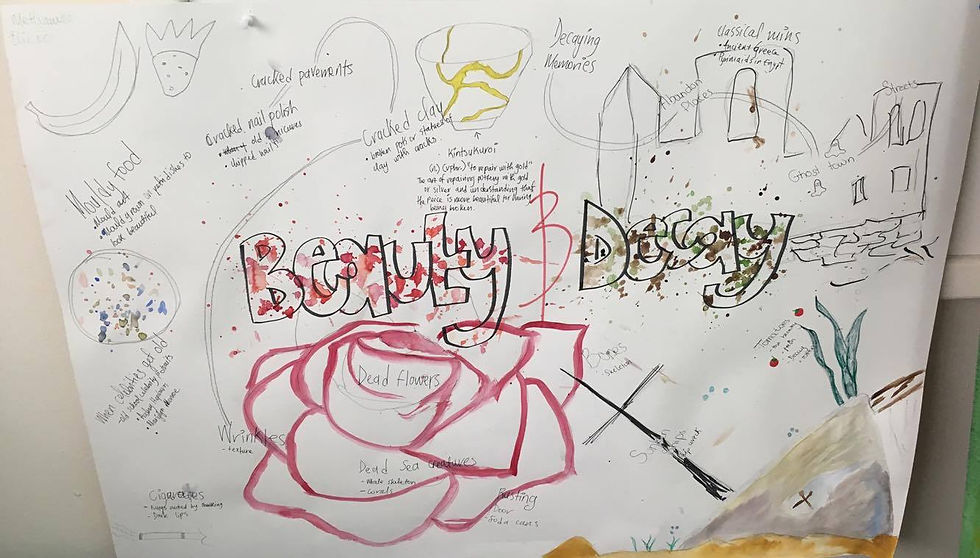
My main ideas that I liked were ; Shipwreck, Decaying Memories, Flowers and run-down buildings. But I then chose Shipwreck as I can relate to it more

This Picture was one of the pictures that have inspired me as I really liked the idea of how the picture shows under the sea and above the sea. Which I thought really showed the meaning of Beauty and Decay.

This is my final product. What I really liked in this is that it turned out quite decent looking. I really liked the reflection of debris at the bottom of the sea that is just underneath the boat. It is almost camouflaged to the sea. This image has a meaning of Beauty and Decay to me; the sea is the beauty and the boat is the decay.
My main ideas that I liked were ; Shipwreck, Decaying Memories, Flowers and run-down buildings. But I then chose Shipwreck as I can relate to it more